
Leave your message. Providing free technical consultation for your business !


Case & Guide

FKP-25 Meat Portioner Steak Cutting Machine Instruction Manual

This machine is designed for single-shift cutting of cooked meat, raw meat, or frozen meat, and the technical data in this instruction is also adapted accordingly. The technical data in Article 3.2 also applies here. It is necessary to pay attention to strictly maintaining the minimum temperature of meat at - 4°C. The product quality depends on the temperature of the object to be cut and the characteristics of the raw materials. In other cases beyond the specified range, the e-chopping quality cannot be guaranteed. The manufacturer or supplier will not assume the resulting losses, and this risk can only be borne by the user.

The equipment uses a cutting knife to slice the meat fed into the feeding bin. Therefore, the following additional dangerous situations exist:

● There is a possibility that fingers or hands may be cut or even twisted and crushed by coming into contact with the feeding port and the discharging port. Therefore, when the protective device malfunctions, it should be replaced promptly. It is strictly prohibited to modify the protective device privately.
● There is a risk of being cut when working in contact with the blade. Therefore, when cleaning, disassembling, and assembling the blade, pay attention to the dryness around the standing position. The area should not be slippery, and wear protective gloves such as wire mesh gloves.
● Before maintenance and repair, the cause of the machine failure should be identified. If the cause of the failure cannot be determined, please contact our company's after-sales service promptly before carrying out maintenance and repair.

● The operations manager must prohibit unauthorized personnel from operating the machine.
● The operating electrician must possess electrical expertise or have received training under the guidance and supervision of professionals, and operate according to electrical technical specifications.
● Personnel engaged in electrical and switch control, as well as electrical installation, must be authorized electrical professionals.
● After professionals have completed the work, the equipment must undergo a safety function test before it can be put into production and operation.
● The manager should conduct job and capacity training for operators and carry out regular inspections. Use the maintenance and operation manual as the basis for guidance, and the operator must record the guidance process.
● When operating the electrical part of the equipment, the power supply plug must be unplugged, and it is necessary to check whether the equipment is live. The power supply plug must be equipped with a waterproof protective cover.
● After maintenance and repair, the removed or opened protective covers must be restored to their original state.
● The equipment can only be used when there are no technical failures, when safety procedures are followed, when there is a sense of danger awareness, and when the operation and repair tips are complied with. Special failures that affect the safety of the equipment must be eliminated immediately.
● When there are changes in the operation of the machinery and equipment, the operator should stop the machine immediately and notify the relevant personnel of the failure situation.
● Adding auxiliary equipment to the machinery and equipment, modifying the equipment, or causing damage to the safety facilities must be approved in writing by the manufacturer and accompanied by technical advice.
Before starting and using the machine each time, make sure to check that there are no hard objects inside the bin.
Daily Function Inspection:
1、Open the cutting bin door | The green light on the control panel flashes. | It is normal (If it doesn't flash, it is abnormal).) |
2、Open the feeding bin door | The green light on the control panel flashes | It is normal (If it doesn't flash, it is abnormal). |
3、Open the discharging bin door | The green light on the control panel flashes. | It is normal (If it doesn't flash, it is abnormal). |
4、When the doors of the cutting bin, the feeding bin, and the discharging bin are all closed | The green light on the control panel doesn't flash. | It is normal (If it flashes, it is abnormal). |
Ⅱ、Introduction of FXFM Meat Cutter
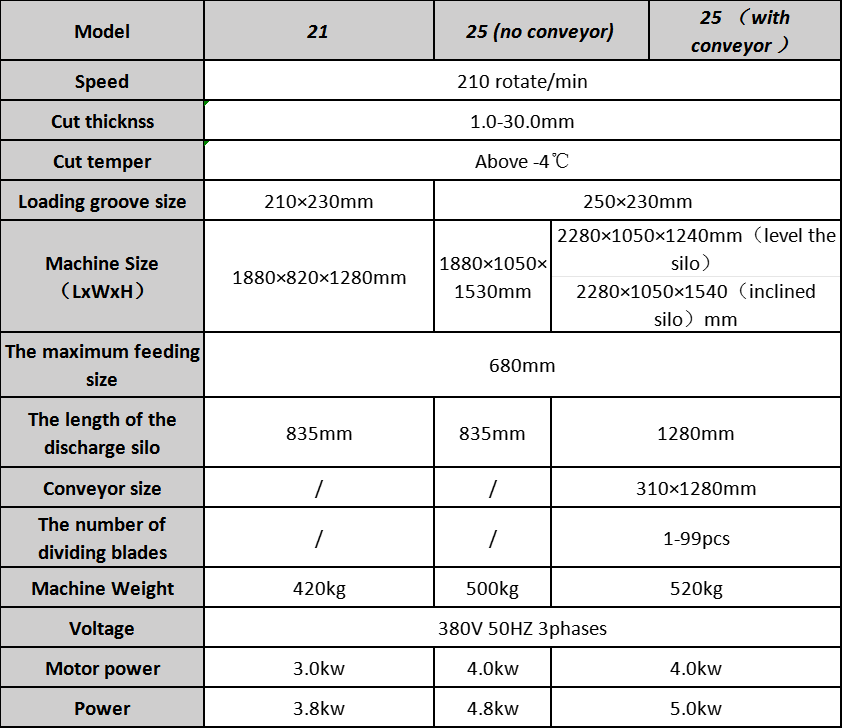
Ⅱ-1、Machine specifications:
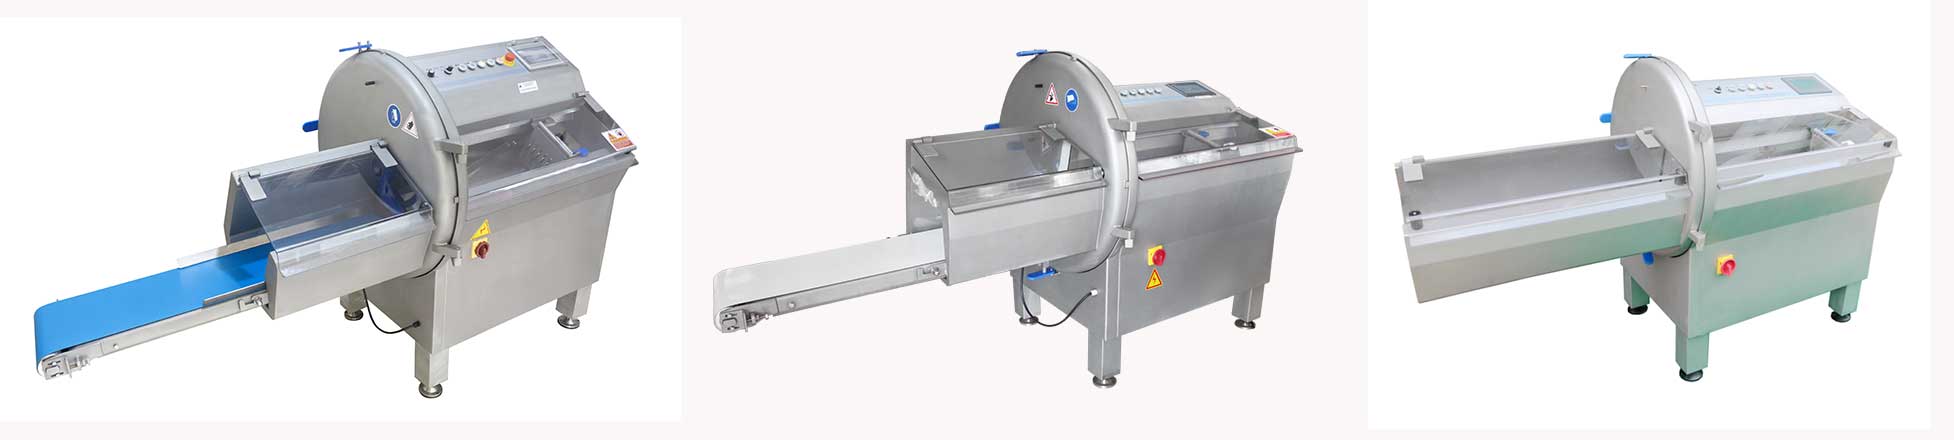
Ⅱ-2、Function of a meat cutter:
Slicing cheese/slicing meat/cutting steak

Ⅲ、How to operate the meat cutter
Ⅲ-1、Instructions for the Control Panel:

● Stop function: Press the button, and the machine will stop working immediately.
● Position memory function: Before starting the machine, use ⑦ or ⑧ to adjust the gripper to any position in the inlet hopper. Press the stop button, and the current position will be automatically memorized. After starting and completing the cutting, the gripper will retreat to this position. Until the next stop button is pressed, the system will memorize the current position again. Pressing the stop button during the cutting process will also memorize the current position.
Ⅲ-2、Installation of the Machine:
1. Installation
The equipment must be installed on a solid ground. Any shaking or vibration is not allowed during the slicing process. (The four support feet of the machine can be adjusted to ensure the machine is stable.)
The rear part of the equipment should not be placed too close to the wall. Some clearance should be left for maintenance and repair.
2. Power Connection
If the power supply voltage is different from the specified one, make changes according to the parameters provided by the manufacturer and replace the corresponding electrical components.
If the on-site voltage is higher or lower than the voltage specified for the equipment, a transformer should be installed for the equipment.
If the on-site voltage is unstable, a voltage regulator should be installed for the equipment.
Before starting the machine, it is necessary to confirm that the power supply voltage is 380V, there is no phase loss, and the neutral wire and the live wire are not connected in reverse (Default: The blue wire is the neutral wire)
Note: Click the picture below to watch the meat cutter video.

Leave your message. Providing free technical consultation for your business !